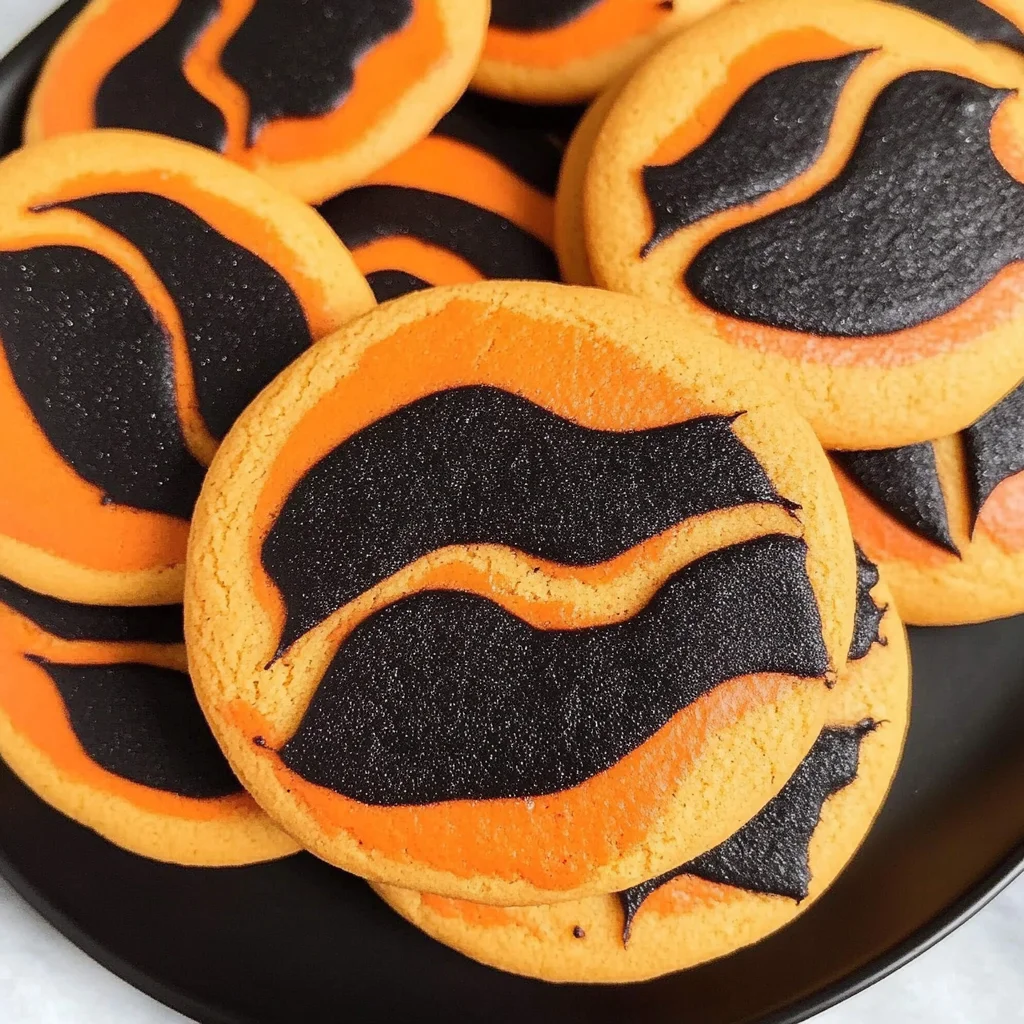
Orange and Black Halloween Sugar Cookies
If you’re looking for a fun and festive treat to celebrate Halloween, then these Orange and Black Halloween Sugar Cookies are just the thing! They are not only visually striking but also incredibly easy to make. You won’t need any fancy rolling pins or cookie cutters, which makes this recipe perfect for busy weeknights or family gatherings. Just imagine the delight on your little goblins’ faces when they see these colorful cookies!
What makes this recipe special is its simplicity and the joy it brings. Whether you’re hosting a Halloween party, attending a school event, or simply want to bake something seasonal, these cookies will surely add a touch of charm to any occasion.
Why You’ll Love This Recipe
- Easy to prepare: No need for intricate techniques here! Mix, chill, and bake—it’s that simple!
- Family-friendly fun: The vibrant colors make these cookies a hit with kids and adults alike.
- Perfect for any occasion: From Halloween parties to cozy family nights, these cookies fit right in!
- Make-ahead convenience: You can chill the dough ahead of time, making it easy to whip up fresh cookies whenever you need them.
- Deliciously delightful flavor: With the buttery sweetness and rich cocoa undertones, every bite is a treat!

Ingredients You’ll Need
Let’s gather some simple and wholesome ingredients for our spooky treats! This list includes everything you need to create your vibrant Orange and Black Halloween Sugar Cookies.
For the Cookie Dough
- ½ cup unsalted butter, room temp
- ½ cup granulated sugar
- ¼ cup packed brown sugar
- 1 large egg
- 1 ½ teaspoons vanilla extract
- 1 ⅓ cups all-purpose flour
- ¼ teaspoon baking soda
- ¼ teaspoon kosher salt
For Coloring
- 1 tablespoon Dutch process cocoa powder
- 4-5 drops black gel food color
- 4-5 drops orange gel food color
Variations
This recipe is quite flexible, allowing you to get creative with flavors and colors! Here are a few ideas to switch things up:
- Change the colors: Use different gel food colors to match any theme or holiday!
- Add sprinkles: Before baking, sprinkle some festive Halloween sprinkles on top for an extra pop of color.
- Try flavored extracts: Swap out vanilla extract for almond or orange extract for a unique twist.
- Mix in chocolate chips: Fold in dairy-free chocolate chips for added richness!
How to Make Orange and Black Halloween Sugar Cookies
Step 1: Prepare Your Baking Sheets
Start by lining two large cookie sheets with parchment paper. This step is important because it prevents the cookies from sticking and ensures even baking. Set them aside while you prepare your dough.
Step 2: Cream Butter and Sugars
In a large bowl, cream together the room temperature butter with granulated sugar and brown sugar using a hand or stand mixer until light and fluffy. This step is crucial as it incorporates air into the mixture, giving your cookies that lovely soft texture. Next, add in the egg and vanilla extract, mixing until well combined.
Step 3: Combine Dry Ingredients
In a small bowl, whisk together the all-purpose flour, baking soda, and kosher salt. Gradually add this dry mixture to the wet ingredients while mixing gently. It’s okay if some flour remains visible; we want to avoid overmixing at this stage.
Step 4: Divide the Dough
Using a kitchen scale or just your best judgment, divide the cookie dough into two even batches. This ensures each color of dough will be equal in amount.
Step 5: Color the Dough
To one batch of dough, add the cocoa powder along with black gel food color. Mix until fully incorporated. Do the same with the other batch using orange gel food color. These bright colors make our cookies festive!
Step 6: Shape the Cookies
Divide each colored dough into small pieces—about 2 teaspoons each—and roll them into balls. For an exciting look, gently press one piece of black dough against one piece of orange dough before rolling them together into a ball. Repeat this until all dough is used.
Step 7: Chill Before Baking
Chill your shaped cookie balls in the fridge for about 15 minutes while preheating your oven to 350°F. Chilling helps maintain their shape during baking.
Step 8: Bake Your Cookies
Once chilled, place your cookie balls on parchment-lined sheets with at least two inches between each ball to allow room for spreading. Bake them in your preheated oven for 12-15 minutes or until you notice that the edges have set but centers remain soft.
Step 9: Cool Down
After baking, let your cookies cool on the sheet for about five minutes before transferring them to a wire rack. This cooling period allows them to firm up slightly while still retaining their deliciously chewy texture.
And there you have it! A delightful batch of Orange and Black Halloween Sugar Cookies ready to impress everyone around you! Enjoy sharing (or keeping) these spooky treats!
Pro Tips for Making Orange and Black Halloween Sugar Cookies
Baking can be a delightful experience, especially when you have some handy tips up your sleeve!
-
Use room temperature butter: This ensures a better creaming process, leading to a fluffier cookie texture. Cold butter can make it difficult to achieve that light and airy consistency.
-
Don’t overmix the dough: Overmixing can lead to tough cookies. Mix just until the flour is incorporated; a few streaks are okay, as you’ll combine the dough later when forming the balls.
-
Chill the dough: Chilling helps solidify the fats in the dough, which prevents spreading during baking and results in perfectly shaped cookies. Plus, it makes handling the dough easier!
-
Invest in gel food coloring: Gel food coloring provides vibrant hues without altering the dough’s consistency. Liquid food coloring can make the dough too wet and affect baking.
-
Keep an eye on baking time: Every oven is different! Start checking your cookies at 12 minutes to prevent overbaking. You want them to be set around the edges but still slightly soft in the center.
How to Serve Orange and Black Halloween Sugar Cookies
These Halloween sugar cookies are not only fun to make but also a treat to present! Here are some delightful ways to showcase them during your spooky celebrations.
Garnishes
- Sprinkles: Add some festive orange and black sprinkles on top of the cookies right after they come out of the oven for an extra touch of Halloween cheer.
- Edible glitter: A sprinkle of edible glitter can transform your cookies into magical treats that glisten under party lights, captivating both kids and adults alike.
Side Dishes
- Pumpkin spice hot chocolate: This cozy drink pairs perfectly with your cookies, enhancing their flavors while providing warmth on crisp autumn evenings.
- Apple cider: The sweet and tangy notes of apple cider complement the sugary goodness of these cookies, making for a refreshing pairing.
- Caramel popcorn: Sweet, crunchy caramel popcorn adds texture and a festive vibe to your dessert spread, inviting guests to indulge in multiple treats.
- Cheese platter: A selection of cheeses with fruits or crackers offers a savory contrast to your sweet cookies, creating a balanced snack table that caters to all tastes.
Now that you have everything you need for these delightful Orange and Black Halloween Sugar Cookies, get ready to impress your friends and family with your baking skills! Happy Halloween baking!
Make Ahead and Storage
These Orange and Black Halloween Sugar Cookies are perfect for meal prep, allowing you to whip up a batch ahead of time for your spooky celebrations. Whether you’re planning a party or simply want to enjoy a festive treat throughout the week, here’s how to store and manage your cookies.
Storing Leftovers
- Store cookies in an airtight container at room temperature.
- They will stay fresh for about 5-7 days.
- If you notice them getting a bit dry, consider adding a slice of bread in the container to maintain moisture.
Freezing
- To freeze, place cookies in a single layer on a baking sheet and freeze until solid.
- Once frozen, transfer them to a freezer-safe bag or container.
- Frozen cookies can last for up to 3 months.
Reheating
- To reheat frozen cookies, preheat your oven to 350°F (175°C).
- Place cookies on a baking sheet and bake for about 5-7 minutes until warm.
- Enjoy them fresh out of the oven for that just-baked taste!
FAQs
Here are some common questions about making these delightful treats.
Can I make Orange and Black Halloween Sugar Cookies without gel food color?
Yes! You can use natural food color alternatives like beet juice for red/pink shades or turmeric for yellow shades. However, the colors may not be as vibrant as with gel food coloring.
How should I serve Orange and Black Halloween Sugar Cookies?
These cookies are great for parties, school events, or as fun snacks at home. You can also decorate them with icing or sprinkles for extra flair!
Can I customize the flavors in my Orange and Black Halloween Sugar Cookies?
Absolutely! Feel free to experiment by adding spices like cinnamon or nutmeg, or even using different extracts such as almond or orange to switch things up.
What is the best way to store leftover Orange and Black Halloween Sugar Cookies?
Store in an airtight container at room temperature for up to 5-7 days. For longer storage, freeze them in a freezer-safe bag.
How many servings does this recipe yield?
This recipe yields approximately 24 delicious cookies—perfect for sharing with friends and family!
Final Thoughts
I hope you enjoy making these vibrant Orange and Black Halloween Sugar Cookies as much as I do! They add a festive touch to any gathering while being incredibly easy to prepare without rolling or cutting. Remember, baking is all about having fun, so don’t hesitate to get creative with your decorations! Happy baking, and may your Halloween be filled with sweet treats and joyful moments.
Orange and Black Halloween Sugar Cookies
Looking to add a festive touch to your Halloween celebrations? These Orange and Black Halloween Sugar Cookies are the perfect treat! With their vibrant colors and delightful flavors, they’re sure to impress both kids and adults alike. This no-roll, no-cut recipe is incredibly simple, making it ideal for busy weeknights or family gatherings. Just mix, chill, and bake—it’s that easy! Imagine the joy on little ones’ faces as they indulge in these sweet, buttery cookies featuring rich cocoa and a hint of vanilla. Perfect for parties or cozy nights at home, these cookies are a must-have addition to your seasonal baking repertoire!
- Prep Time: 20 minutes
- Cook Time: 15 minutes
- Total Time: 35 minutes
- Yield: Approximately 24 cookies 1x
- Category: Dessert
- Method: Baking
- Cuisine: American
Ingredients
- ½ cup unsalted butter
- ½ cup granulated sugar
- ¼ cup packed brown sugar
- 1 large egg
- 1 ½ teaspoons vanilla extract
- 1 ⅓ cups all-purpose flour
- ¼ teaspoon baking soda
- ¼ teaspoon kosher salt
- 1 tablespoon Dutch process cocoa powder
- 4–5 drops black gel food color
- 4–5 drops orange gel food color
Instructions
- Preheat your oven to 350°F (175°C) and line two large cookie sheets with parchment paper.
- In a large bowl, cream together room temperature butter with granulated and brown sugars until light and fluffy. Add egg and vanilla; mix until combined.
- In a separate bowl, whisk together flour, baking soda, and salt. Gradually add this dry mixture to the wet ingredients without overmixing.
- Divide the dough into two equal parts. Color one batch with cocoa powder and black gel food color; color the other batch with orange gel food color.
- Roll small pieces of each colored dough into balls and press them together before rolling into one ball. Repeat until all dough is used.
- Chill the cookie balls for 15 minutes in the refrigerator.
- Bake in preheated oven for 12-15 minutes until edges are set but centers remain soft. Allow cookies to cool slightly on sheets before transferring to a wire rack.
Nutrition
- Serving Size: 1 serving
- Calories: 120
- Sugar: 8g
- Sodium: 50mg
- Fat: 5g
- Saturated Fat: 3g
- Unsaturated Fat: 2g
- Trans Fat: 0g
- Carbohydrates: 17g
- Fiber: 0g
- Protein: 1g
- Cholesterol: 15mg