Mummy Dogs
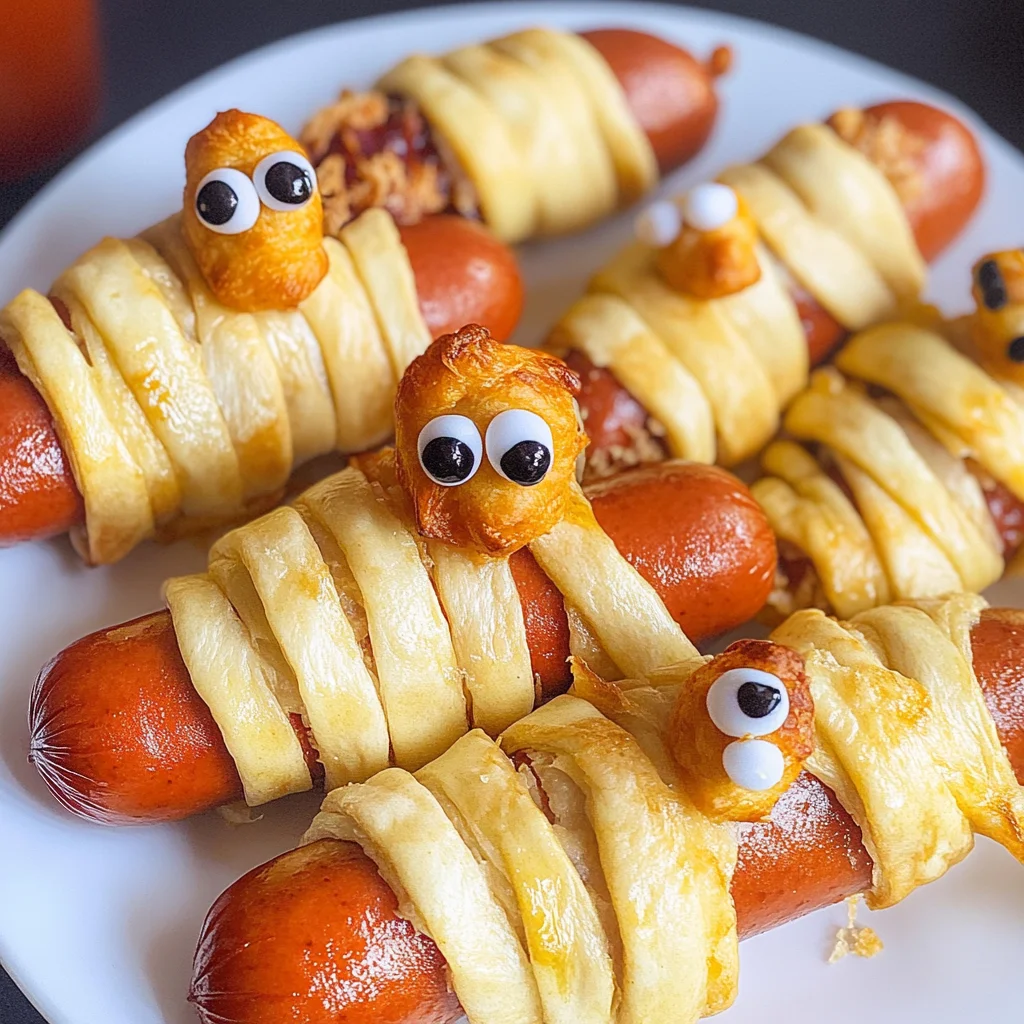
If you’re looking for a fun and spooky treat to celebrate Halloween, Mummy Dogs are just the ticket! These delightful little bites are not only cute but also incredibly easy to whip up. With their flaky, golden dough wrapped around tasty hot dogs, they make for a perfect finger food that kids and adults alike will enjoy at any gathering. Whether you’re hosting a Halloween party or just want to add some festive flair to dinner, these Mummy Dogs will surely be a hit!
What I love most about this recipe is how simple it is! You can have these delicious Mummy Dogs ready in no time, making them ideal for busy weeknights or last-minute get-togethers. Plus, they’re a great way to get the family involved in the kitchen — who wouldn’t want to help wrap up some mummies?
Why You’ll Love This Recipe
- Quick Preparation: With just 15 minutes of prep time, you can have these Mummy Dogs ready before you know it!
- Family-Friendly Fun: Kids love helping out in the kitchen, especially when it involves creating spooky snacks.
- Perfect for Parties: These adorable treats are sure to be the star of any Halloween gathering or casual get-together.
- Versatile Dish: Great as an appetizer, snack, or even a main dish that everyone will rave about.
- Deliciously Simple: The combination of flaky crescent rolls and savory hot dogs makes for a satisfying bite.
Ingredients You’ll Need
To make these delightful Mummy Dogs, you’ll need some simple and wholesome ingredients that are easy to find. Here’s what you’ll need:
- 16 hot dogs
- 8 oz refrigerated crescent rolls
- 32 candy eyeballs (for decorating)
Variations
One of the best things about Mummy Dogs is how flexible the recipe can be. If you’re looking to switch things up or cater to different tastes, here are some fun variations:
- Swap the protein: Use turkey or chicken hot dogs for a lighter option that still packs flavor.
- Add cheese: Place a slice of your favorite cheese inside the dough with the hot dog for an extra melty surprise!
- Spice it up: Try using spicy chicken sausages for those who enjoy a little kick in their snacks.
- Dough alternatives: If you want a gluten-free option, use gluten-free crescent rolls instead.
How to Make Mummy Dogs
Step 1: Prepare the Hot Dogs
Start by removing the hot dogs from their packaging. It’s important to let them dry off a bit so that they hold onto the dough better during cooking.
Step 2: Roll Out the Dough
Next, unroll your crescent rolls without separating them into individual pieces. Pinch closed any perforations so that you have one solid sheet of dough. This helps create a nice wrap around your mummies!
Step 3: Cut Strips
Place your dough between two sheets of parchment paper and roll it out until it’s about 1/8” thick. Using a pizza cutter or knife, cut the dough into strips ranging from 1/8” to 1/4” wide. Remember, these don’t have to be perfect — uneven strips can add character!
Step 4: Wrap the Hot Dogs
Now comes the fun part! Start wrapping each hot dog with your strips of dough. Aim for a loose wrap so that some of the hot dog is still visible. This technique mimics how mummies are traditionally wrapped while ensuring deliciousness in every bite.
Step 5: Leave Room for Eyes
As you wrap each hot dog, make sure to leave an open spot somewhere on top; this is where you’ll place those cute candy eyeballs later!
Step 6: Air Frying Time
Place your wrapped hot dogs into an air fryer basket lined with parchment paper (this helps prevent sticking). Cook at 350°F for about 12-15 minutes until golden brown and fully cooked.
Step 7: Decorate Your Mummies
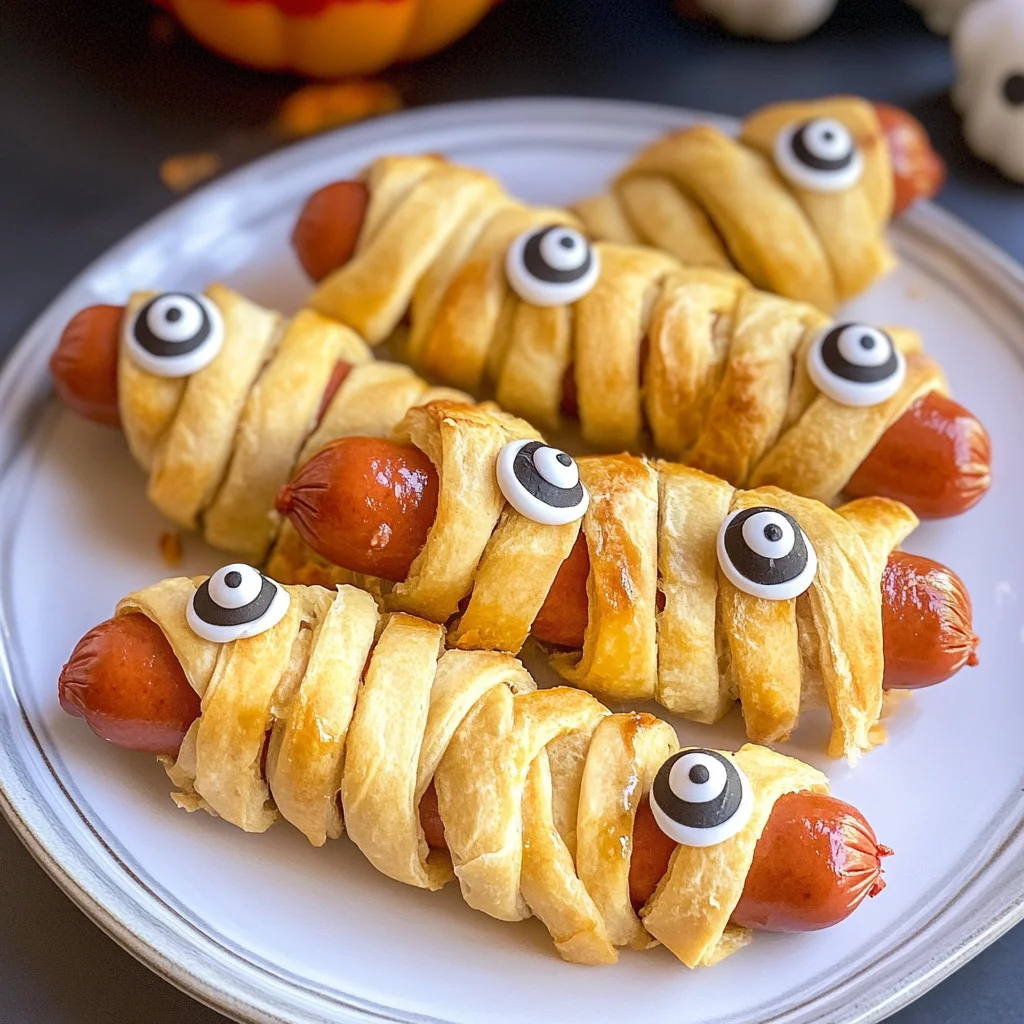
Once they’re cooked and fragrant, take them out and let them cool slightly before adding those adorable candy eyeballs on top! A tiny drop of ketchup or mustard works perfectly as “glue” to hold them in place.
Step 8: Enjoy!
Your spooky Mummy Dogs are now ready! Serve them warm and watch everyone enjoy this fun twist on classic comfort food.
With these easy steps, you’ll create an unforgettable treat that’s perfect for Halloween celebrations or any casual gathering!
Pro Tips for Making Mummy Dogs
Creating the perfect Mummy Dogs is all about fun and a little finesse! Here are some tips to help you achieve that spooky look and delicious taste.
-
Keep it dry: Make sure your hot dogs are dry before wrapping them. This helps the dough adhere better, ensuring a nice, even bake without any sogginess.
-
Vary the strips: When cutting the dough strips, try to keep them uneven. This adds to the mummy’s whimsical appearance, making each one unique and more fun!
-
Don’t overwrap: Aim for a loose wrap around the hot dogs. This not only gives a more authentic mummy look but also allows space for the dough to rise and become golden without being too thick.
-
Use parchment paper: Lining your air fryer basket with parchment prevents sticking and makes clean-up much easier. Plus, it allows for better airflow around your Mummy Dogs, helping them cook evenly.
-
Get creative with eyes: Instead of just placing candy eyeballs on top, consider using different colored toppings or even small bits of vegetables to give each mummy its own personality!
How to Serve Mummy Dogs
Serving Mummy Dogs can be as fun as making them! You can create a spooky platter that will delight both kids and adults alike during Halloween gatherings or any casual get-together.
Garnishes
- Chopped parsley or cilantro: A sprinkle of fresh herbs adds a pop of color and freshness that contrasts beautifully with the golden dough.
- Ketchup and mustard: Offer these classic condiments in squeeze bottles for easy dipping or drizzling; they can also double as “blood” for your mummies!
Side Dishes
- Crispy Veggie Sticks: Carrot and cucumber sticks provide a refreshing crunch that balances out the richness of the Mummy Dogs. Pair with hummus for added flavor!
- Pumpkin Soup: A warm bowl of pumpkin soup is perfect for fall gatherings. It’s creamy, comforting, and complements the savory taste of the Mummy Dogs beautifully.
- Sweet Potato Fries: These slightly sweet fries add a hearty side option that pairs wonderfully with hot dogs. Their crispy texture provides a nice contrast to the soft pastry.
- Spooky Fruit Salad: Combine seasonal fruits like oranges, grapes, and apples into a colorful salad. Adding ghost-shaped marshmallows on top creates a playful touch that kids will love.
Enjoy creating your festive feast with these delightful Mummy Dogs! Whether they’re part of an elaborate Halloween spread or just a fun weeknight dinner, they’re sure to bring smiles all around. Happy cooking!
Make Ahead and Storage
Mummy Dogs are not only a fun treat to serve at parties, but they also shine when it comes to meal prep! You can make them ahead of time and store them for an easy snack or dinner option throughout the week.
Storing Leftovers
- Allow any leftover Mummy Dogs to cool completely before storing.
- Place them in an airtight container in the refrigerator.
- They will stay fresh for up to 3 days.
Freezing
- Ensure Mummy Dogs are fully cooled before freezing.
- Wrap each one in plastic wrap or aluminum foil to prevent freezer burn.
- Store wrapped Mummy Dogs in a freezer-safe bag or container for up to 2 months.
Reheating
- For best results, reheat Mummy Dogs in the air fryer at 350°F for about 5-7 minutes until warmed through.
- Alternatively, you can reheat them in the microwave for about 30-45 seconds, though they may be less crispy.
FAQs
If you’re curious about Mummy Dogs, here are some common questions that might help!
Can I use different types of hot dogs for Mummy Dogs?
Absolutely! You can use turkey, chicken, or plant-based hot dogs. Just make sure they fit well inside the crescent roll strips.
How do I make Mummy Dogs spookier?
Get creative with your decorating! Use different types of edible eyes or even add some spooky faces with ketchup or mustard on the dough before cooking.
Can I make Mummy Dogs ahead of time?
Yes! You can prepare Mummy Dogs ahead of time and store them in the fridge or freeze them for later enjoyment.
Final Thoughts
I hope you have as much fun making these Mummy Dogs as I do! They’re not only a delicious treat but also a great way to bring some Halloween spirit into your kitchen. Whether you’re serving them at a party or enjoying a cozy night at home, these little mummies are sure to be a hit. Happy cooking, and don’t forget to share your spooky creations with friends and family!
Mummy Dogs

Celebrate Halloween with these delightful Mummy Dogs, a whimsical twist on classic hot dogs that are perfect for parties or family gatherings. Wrapped in flaky crescent roll dough and adorned with candy eyeballs, these treats offer both fun and flavor. With just a few simple ingredients and minimal prep time, Mummy Dogs are an easy option to get kids involved in the kitchen. Whether you’re hosting a spooky soirée or enjoying a cozy dinner at home, these tasty morsels are sure to be a hit with guests of all ages. Get ready to impress with this creative and festive dish!
- Prep Time: 15 minutes
- Cook Time: 15 minutes
- Total Time: 30 minutes
- Yield: Serves approximately 16 people 1x
- Category: Appetizer
- Method: Frying
- Cuisine: American
Ingredients
- 16 hot dogs (turkey or chicken recommended)
- 8 oz refrigerated crescent rolls
- 32 candy eyeballs (for decoration)
Instructions
- Prepare hot dogs by drying them off to ensure the dough adheres well.
- Unroll the crescent rolls into one solid sheet by pinching any perforations closed.
- Roll out the dough between parchment paper to about 1/8" thick and cut it into strips (1/8" to 1/4" wide).
- Carefully wrap each hot dog with the dough strips, leaving space for candy eyes.
- Place wrapped hot dogs in an air fryer basket lined with parchment paper and cook at 350°F for 12-15 minutes until golden brown.
- Let cool slightly before adding candy eyeballs using ketchup or mustard as 'glue.'
- Serve warm and enjoy!
Nutrition
- Serving Size: 1 Mummy Dog (45g)
- Calories: 150
- Sugar: 0g
- Sodium: 450mg
- Fat: 8g
- Saturated Fat: 2g
- Unsaturated Fat: 5g
- Trans Fat: 0g
- Carbohydrates: 13g
- Fiber: 0g
- Protein: 5g
- Cholesterol: 20mg