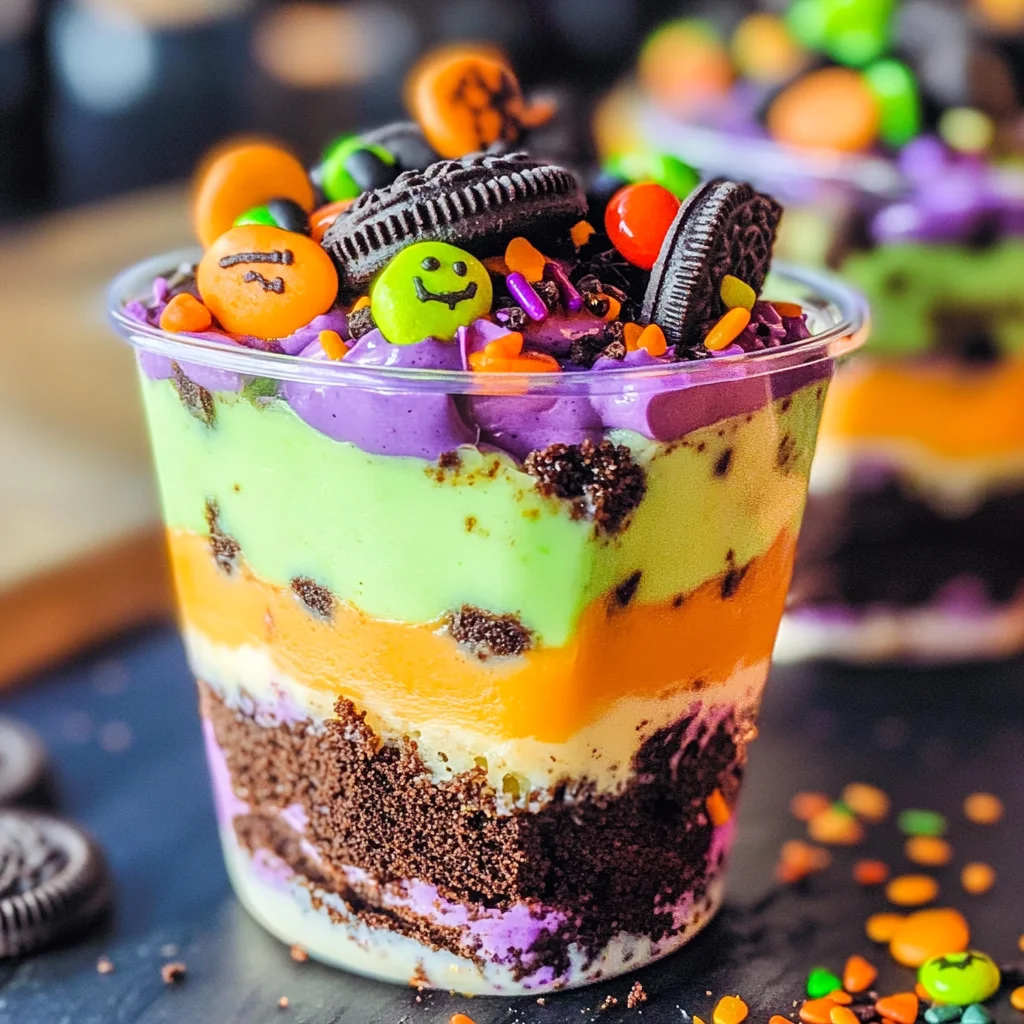
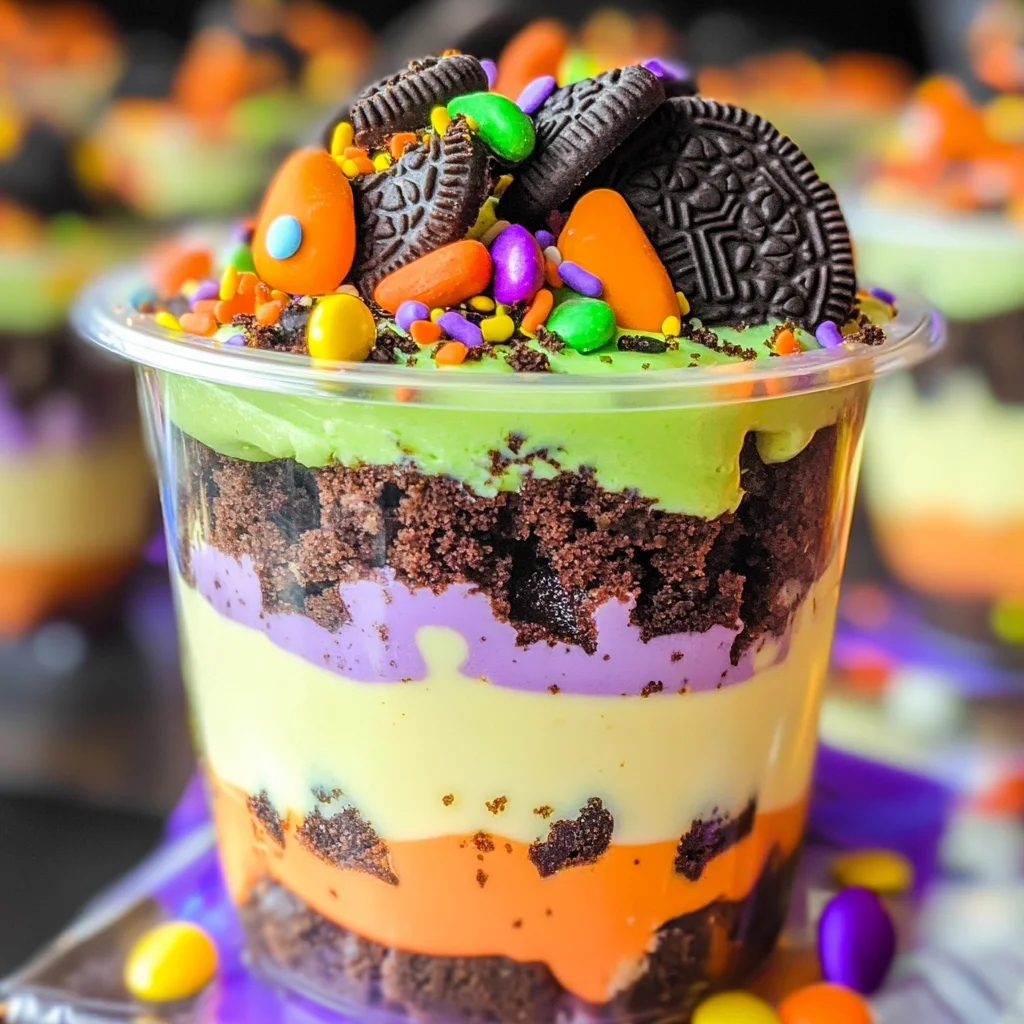
Halloween Pudding Cups
If you’re looking for a fun and festive treat this Halloween, look no further than these delightful Halloween Pudding Cups! This recipe is not just a dessert; it’s a whimsical creation that brings joy to both kids and adults alike. The bright colors, creamy textures, and the nostalgic crunch of Oreo cookies make these cups a favorite at parties, family gatherings, or even just as a sweet surprise on a busy weeknight.
What I love most about these Halloween Pudding Cups is how easy they are to whip up. You can prepare them ahead of time, making them perfect for those hectic days leading up to Halloween. Plus, they’re a fantastic way to get creative with your little ones in the kitchen!
Why You’ll Love This Recipe
- Simple Preparation: With just a few easy steps, you’ll have a dessert that looks like it took hours to create!
- Family-Friendly Fun: Kids will love helping layer the colors and decorating with candy and sprinkles.
- Make-Ahead Convenience: Prepare these cups in advance and chill them until you’re ready to serve.
- Deliciously Decadent: The combination of chocolate cake, creamy pudding, and crunchy Oreos makes each bite irresistible!
Ingredients You’ll Need
These Halloween Pudding Cups use simple and wholesome ingredients that you may already have at home. Gather these goodies for a spooky yet scrumptious treat!
For the Cake
- 1 15.25 ounce box devils food cake
- Water (plus oil and eggs as called for on the box)
For the Pudding
- 2 3.4 ounce boxes white chocolate instant pudding
- 4 cups cold milk
For the Assembly
- 8 ounces whipped topping
- Neon green (and orange and purple food coloring)
- 1 ½ cups crushed Oreo cookies
- Milano cookies (for decoration)
- Halloween candy and sprinkles for decor
- 10 8-ounce clear buckets
Variations
The beauty of these Halloween Pudding Cups is their versatility! Feel free to switch things up based on your preferences or what you have on hand.
- Change the Cake Flavor: Swap out the devils food cake for vanilla or red velvet for a unique twist.
- Experiment with Puddings: Try different flavors of instant pudding—vanilla or butterscotch would be delicious!
- Add Fruits: Layer in some fruit like sliced bananas or strawberries for an added freshness.
- Decorate Your Way: Use different types of candies or themed sprinkles to match your party’s vibe.
How to Make Halloween Pudding Cups
Step 1: Bake the Cake
Preheat your oven to 350 degrees Fahrenheit. Grease a 9×13 baking dish while you mix together your cake batter according to the package instructions. This step is crucial as it sets the base for your layered dessert. Once baked, allow it to cool completely on a rack before slicing it into bite-sized squares.
Step 2: Prepare the Pudding
While your cake cools, it’s time to bring our creamy pudding to life! In a large bowl, combine your white chocolate pudding mix with cold milk and whisk until it thickens. This step is essential because it gives the pudding its luscious texture that pairs perfectly with the cake.
Step 3: Color Your Pudding
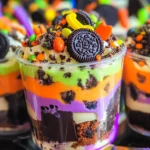
After thickening, divide the pudding into three bowls. Add neon food coloring to each bowl, mixing until you achieve vibrant hues—think spooky greens, oranges, and purples! This visual element makes our Halloween Pudding Cups extra festive.
Step 4: Assemble Your Cups
Now comes the fun part! In each cup, start layering by placing squares of chocolate cake at the bottom. Follow this with one color of pudding, then sprinkle crushed Oreos on top. Repeat this process until your cups are filled beautifully with layers of flavor and color. Finish off with whipped topping and decorations like Milano cookies or festive sprinkles!
Step 5: Chill & Serve
Once assembled, place your cups in the fridge to chill for at least an hour before serving. This waiting period allows all those delicious flavors to meld together beautifully. When you’re ready, gather friends and family around for a spook-tacular treat that’s sure to delight everyone!
Pro Tips for Making Halloween Pudding Cups
Creating the perfect Halloween Pudding Cups is all about the little details! Here are some tips to help you achieve spooktacular success.
-
Use Room Temperature Ingredients: Starting with room temperature ingredients helps your cake mix blend more smoothly, resulting in a lighter cake texture that’s both fluffy and delicious.
-
Chill Your Bowls: Before whipping the topping, chill your mixing bowl and beaters in the fridge. This helps to whip up the topping faster and gives it a fluffier consistency!
-
Layer Creatively: When layering your pudding and cake, consider alternating colors for a more visually stunning effect. This not only looks delightful but also adds a fun surprise with each spoonful.
-
Crush Oreos Properly: For the crushed Oreo layer, place them in a zip-top bag and use a rolling pin to crush them into fine bits. This will ensure they mix well with the pudding and provide that classic “dirt” look.
-
Get Creative with Decorations: Don’t hold back on using fun Halloween-themed decorations like gummy worms or candy eyes! These touches make your dessert even more festive and appealing to kids and adults alike.
How to Serve Halloween Pudding Cups
Presentation can elevate your Halloween Pudding Cups from simple to spectacular! Here are some ideas for serving these delightful treats.
Garnishes
- Colorful Sprinkles: Add a sprinkle of Halloween-themed sprinkles on top for an extra pop of color and crunch.
- Whipped Topping Swirls: Use a piping bag to create beautiful swirls of whipped topping on each cup for an elegant touch.
- Candy Toppers: Place some bite-sized candy corn or chocolate spiders on top for a playful and festive flair!
Side Dishes
- Apple Slices with Caramel Dip: Crisp apple slices paired with creamy caramel dip provide a refreshing contrast to the rich pudding cups.
- Pumpkin Soup: A warm bowl of pumpkin soup is perfect for this time of year, adding a cozy element to your dessert spread.
- Cheese Platter: A selection of assorted cheeses complements the sweetness of the pudding cups beautifully while offering savory options for guests.
- Veggie Tray with Hummus: Fresh vegetables served with hummus provide a healthy crunch that balances out the indulgence of the pudding cups.
With these serving suggestions and pro tips, you’re all set to impress at your next Halloween gathering! Enjoy making these festive treats and don’t forget to have fun while doing it!
Make Ahead and Storage
These Halloween Pudding Cups are not only fun to make but also perfect for meal prep! They can be assembled ahead of time, making them an excellent choice for parties or gatherings.
Storing Leftovers
- Store any leftover pudding cups in an airtight container in the refrigerator.
- Consume within 3-4 days for the best taste and texture.
- Keep the toppings like candy and crushed Oreos separate until serving to maintain their crunch.
Freezing
- It’s best not to freeze these pudding cups as the texture of the whipped topping may change upon thawing.
- If you have leftover cake, you can freeze it wrapped tightly in plastic wrap or foil for up to 3 months.
Reheating
- There’s no need to reheat these pudding cups; they are best enjoyed cold right out of the fridge!
- If you want to serve them slightly warmer, allow them to sit at room temperature for about 15 minutes before enjoying.
FAQs
Curious about Halloween Pudding Cups? Here are some common questions!
Can I use other flavors of pudding for Halloween Pudding Cups?
Absolutely! You can experiment with different flavors of instant pudding, such as vanilla or chocolate, to create your own unique twist on Halloween Pudding Cups.
How can I make my Halloween Pudding Cups more festive?
You can decorate your Halloween Pudding Cups with themed sprinkles, edible glitter, or spooky candies like gummy worms or candy eyes to add a fun touch.
Can I prepare Halloween Pudding Cups in advance?
Yes! These delightful treats can be made a day ahead and stored in the fridge until you’re ready to serve them. This makes them perfect for parties!
What is the best way to layer my Halloween Pudding Cups?
Start with a layer of cake pieces at the bottom, followed by colorful pudding layers, and finish with whipped topping. Top with crushed Oreos and fun candies for a festive look!
Final Thoughts
I hope this recipe brings a smile to your face and joy to your celebrations! Halloween Pudding Cups are not only delicious but also a delightful way to get creative in the kitchen. Enjoy making these festive treats with family and friends, and don’t forget to share your experiences. Happy Halloween baking!
Halloween Pudding Cups
Get ready to celebrate Halloween with these irresistible Halloween Pudding Cups! Bursting with vibrant colors and delightful textures, this easy-to-make dessert is perfect for parties, family gatherings, or a fun kitchen project with the kids. With layers of moist chocolate cake, creamy white chocolate pudding, and crunchy crushed Oreos, these spooky treats are sure to impress. Plus, they can be assembled ahead of time, making them a convenient choice for your festive celebrations. Gather your ingredients and let the creativity flow!
- Prep Time: 30 minutes
- Cook Time: 30 minutes
- Total Time: 1 hour
- Yield: Makes approximately 10 servings 1x
- Category: Dessert
- Method: Baking
- Cuisine: American
Ingredients
- 1 box devils food cake mix
- 4 cups cold milk
- 2 boxes white chocolate instant pudding
- 8 ounces whipped topping
- Neon food coloring (green, orange, purple)
- 1 ½ cups crushed Oreo cookies
- Milano cookies and Halloween-themed candy for decoration
Instructions
- Preheat oven to 350°F. Grease a 9×13 baking dish and prepare the cake mix according to package instructions. Bake and cool completely before cutting into squares.
- In a large bowl, whisk together the white chocolate pudding mix and cold milk until thickened.
- Divide the pudding into three bowls and add neon food coloring to each for festive colors.
- In clear cups, layer squares of chocolate cake followed by colored pudding and crushed Oreos. Repeat until cups are filled, then top with whipped topping and decorations.
- Chill in the refrigerator for at least an hour before serving.
Nutrition
- Serving Size: 1 cup (240g)
- Calories: 360
- Sugar: 32g
- Sodium: 220mg
- Fat: 15g
- Saturated Fat: 7g
- Unsaturated Fat: 6g
- Trans Fat: 0g
- Carbohydrates: 54g
- Fiber: 2g
- Protein: 5g
- Cholesterol: 20mg