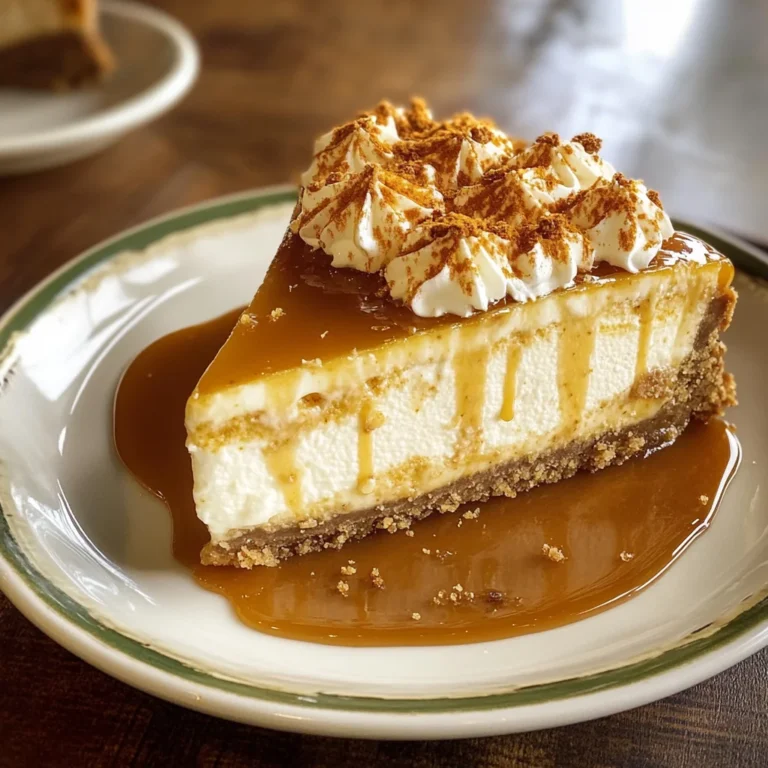
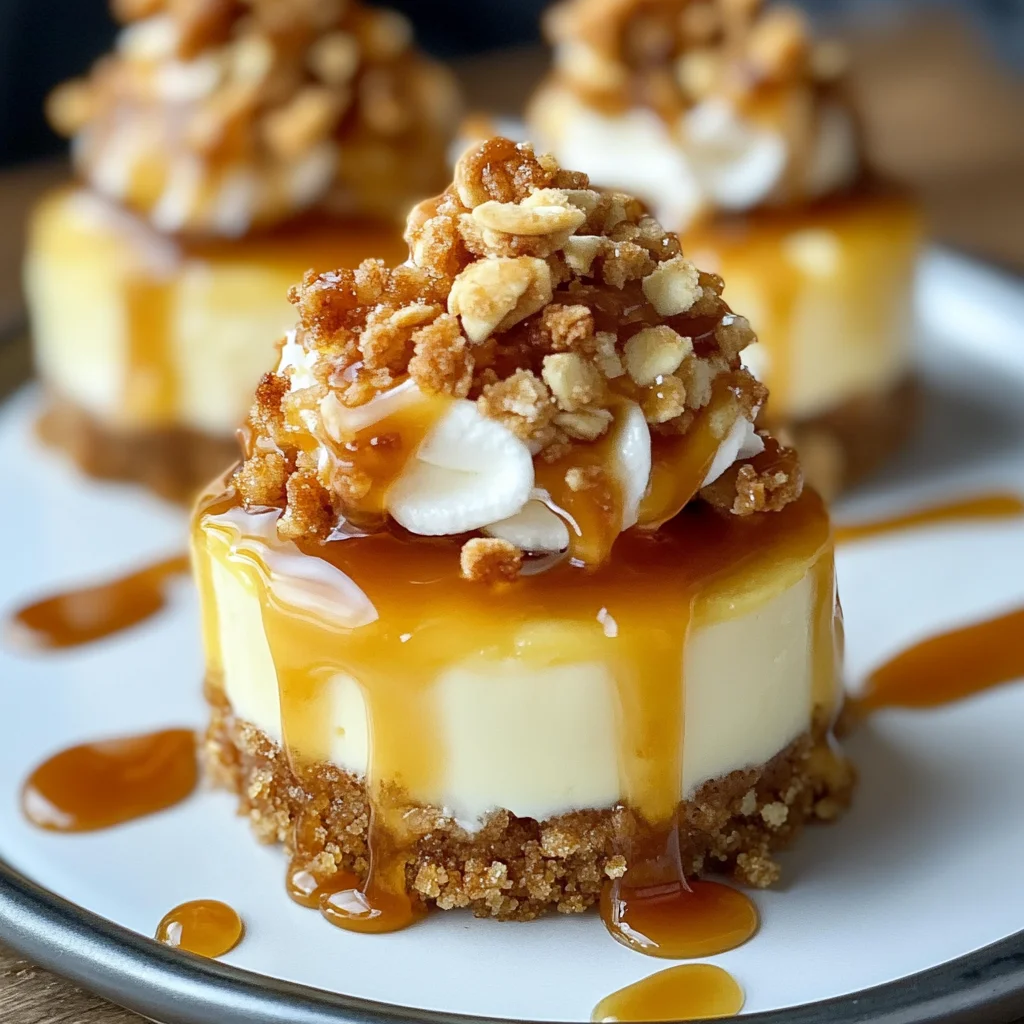
Apple Crisp Mini Cheesecakes
If you’re looking for a delightful dessert that truly embraces the flavors of fall, then these Apple Crisp Mini Cheesecakes are just what you need! With their creamy cheesecake filling, spiced apples, and a buttery oat topping, these little treats capture the spirit of autumn in each delicious bite. They are perfect for cozy family gatherings or even a simple weeknight treat when you’re craving something special.
What makes this recipe so special is its individual portions. Everyone gets their own mini cheesecake, making it easy to share and enjoy. Plus, they can be made ahead of time, so you can focus on enjoying your time with loved ones!
Why You’ll Love This Recipe
- Easy to make: With simple steps and ingredients, you’ll whip these up in no time!
- Family-friendly: Kids and adults alike will love the sweet apple flavor combined with creamy cheesecake.
- Perfect for any occasion: Whether it’s a holiday gathering or a cozy night in, these mini cheesecakes fit right in.
- Make-ahead convenience: Bake them a day in advance and store them in the refrigerator; they taste even better chilled!
- Deliciously comforting: The warm spices and caramel drizzle make these a truly comforting dessert.
Ingredients You’ll Need
Making Apple Crisp Mini Cheesecakes is simple thanks to these wholesome ingredients. You probably have many of them in your kitchen already! Here’s everything you need:
For the Crust
- 3/4 cup graham cracker crumbs
- 1 1/2 tablespoons sugar
- 1/2 teaspoon cinnamon
- 3 tablespoons unsalted butter, melted
For the Cheesecake Filling
- 10 oz cream cheese, softened
- 6 tablespoons sugar
- 1 1/2 teaspoons vanilla
- 2 teaspoons all-purpose flour
- 1 egg
For the Spiced Apples
- 2 medium-small apples, peeled and chopped finely
- 2 teaspoons freshly squeezed lemon juice
- 1 1/2 teaspoons cinnamon
- 1/4 teaspoon nutmeg
- 2 tablespoons light brown sugar
- 1 1/2 teaspoons cornstarch
For the Streusel Topping
- 1/3 cup all-purpose flour
- 1/3 cup light brown sugar
- 1/3 cup quick-cooking oats
- 3/4 teaspoon cinnamon
- 1/8 teaspoon nutmeg
- 2 1/2 tablespoons unsalted butter, melted
For Serving
- Caramel sauce for drizzling
Variations
This recipe is wonderfully flexible! Here are some fun ideas to customize your Apple Crisp Mini Cheesecakes:
- Try different fruits: Swap the apples for pears or add cranberries for a tart twist.
- Add nuts: Chopped walnuts or pecans mixed into the streusel topping can give a nice crunch.
- Change up the spices: Experiment with ginger or allspice to add a different flavor profile.
- Make it chocolatey: Add cocoa powder to the cheesecake filling for a chocolate version.
How to Make Apple Crisp Mini Cheesecakes
Step 1: Prepare the Crust
Start by lining a standard cupcake pan with paper liners. Preheat your oven to 325°F. This step is key because it ensures even baking and makes cleanup easier later!
In a bowl, mix together graham cracker crumbs, sugar, and cinnamon. Then pour in melted butter and stir until well combined. Press about 2 tablespoons of this mixture into each liner. This forms the crust that will hold all those delightful layers together.
Step 2: Make the Streusel Topping
While your crusts chill in the fridge, let’s whip up that delicious streusel topping! In another bowl, combine all-purpose flour, light brown sugar, quick-cooking oats, cinnamon, and nutmeg. Stir in melted butter until you get coarse crumbs. Refrigerate this mixture while we move on to the next step.
Step 3: Prepare the Cheesecake Filling
In a mixing bowl, beat your softened cream cheese with sugar until smooth. Add vanilla and flour; mix just until combined. Now crack in that egg—this will give your cheesecake its lovely texture—mix carefully until just combined.
Step 4: Layer It All Together
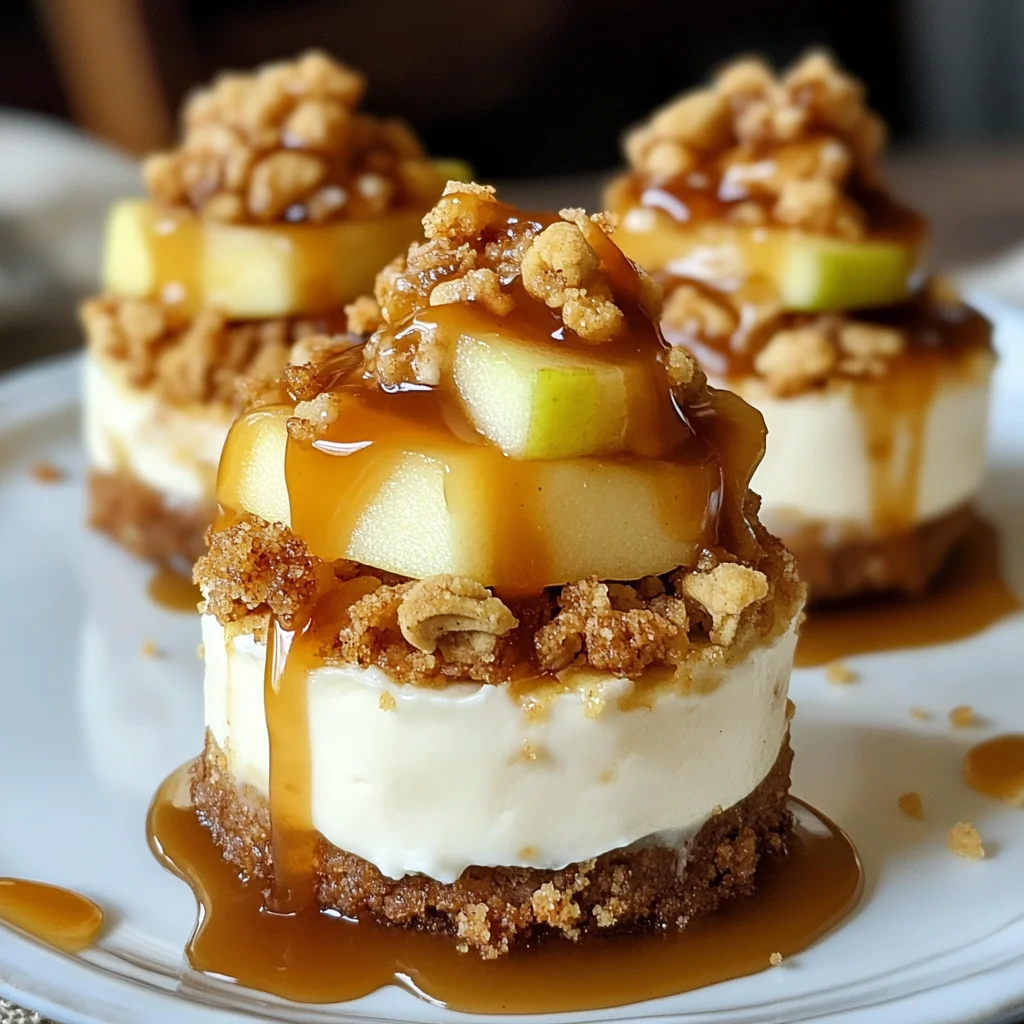
Spoon that creamy cheesecake filling over your crusts, filling them about two-thirds full. Next up is our spiced apple layer! Toss those finely chopped apples with lemon juice, brown sugar, cornstarch, cinnamon, and nutmeg before spooning them over the cheesecake layer. Gently press down on them with your palm to ensure they stay put.
Step 5: Add Streusel Topping
Now comes the best part—generously sprinkle that delicious streusel topping over each mini cheesecake! It adds such great texture and warmth.
Step 6: Bake Away!
Pop your cupcake pan into the preheated oven and bake for about 28-30 minutes or until edges are set but centers still have a slight jiggle. This will ensure they remain creamy!
Step 7: Cool & Serve
Let them cool in the pan for about 30 minutes before transferring them to the fridge to chill completely. When you’re ready to serve, drizzle some caramel sauce on top for an extra touch of sweetness!
Now you have delightful Apple Crisp Mini Cheesecakes ready to impress everyone at home! Enjoy every bite!
Pro Tips for Making Apple Crisp Mini Cheesecakes
Making these delightful mini cheesecakes is a breeze with a few helpful tips to ensure they turn out perfectly every time!
-
Use room temperature cream cheese: This helps create a smooth and creamy filling, preventing lumps and ensuring an even consistency throughout your cheesecakes.
-
Don’t skip the chilling step: Chilling the crust before adding the cheesecake filling helps it hold its shape better during baking, giving you a sturdy base that won’t crumble.
-
Adjust spice levels to your taste: Feel free to modify the amount of cinnamon and nutmeg according to your preference; this allows you to customize the flavor profile of your mini cheesecakes.
-
Keep an eye on baking time: Ovens can vary, so start checking your cheesecakes at 25 minutes. They should be set around the edges but slightly jiggly in the center for that perfect texture.
-
Let them cool completely before serving: Allowing your cheesecakes to cool in the pan and then refrigerating them enhances their flavor and texture, making them even more delicious when served.
How to Serve Apple Crisp Mini Cheesecakes
These Apple Crisp Mini Cheesecakes are not only tasty but also visually appealing. Presenting them beautifully will impress your guests, making any occasion feel special.
Garnishes
- Whipped coconut cream: A dollop on top adds a light and fluffy contrast that complements the rich cheesecake.
- Chopped nuts: Sprinkle some toasted pecans or walnuts for added crunch and flavor.
- Cinnamon dusting: A light sprinkle of cinnamon on top can enhance the aroma and give an extra touch of warmth.
Side Dishes
- Vanilla ice cream: A scoop of creamy vanilla ice cream alongside these cheesecakes creates a delightful contrast in temperature and texture.
- Fresh fruit salad: A refreshing mix of seasonal fruits balances out the sweetness of the cheesecakes and adds a pop of color to your plate.
- Hot apple cider: This warm beverage pairs beautifully with fall desserts, enhancing the apple flavors in your mini cheesecakes.
- Spiced tea: Serve with a cup of chai or spiced herbal tea for an aromatic experience that complements the warm spices in the dessert.
By following these tips and suggestions, you’ll create not just a delicious dessert but also a delightful presentation that’s sure to wow everyone at your table!
Make Ahead and Storage
These Apple Crisp Mini Cheesecakes are perfect for meal prep! You can make them ahead of time, store them properly, and enjoy their delightful flavors whenever you please.
Storing Leftovers
- Allow the mini cheesecakes to cool completely before storing.
- Place them in an airtight container.
- Store in the refrigerator for up to 4 days.
Freezing
- Freeze the mini cheesecakes after they have cooled completely and before adding caramel sauce.
- Wrap each cheesecake individually in plastic wrap, then place them in a freezer-safe container.
- They can be frozen for up to 2 months.
Reheating
- To reheat, remove from the freezer and let them thaw in the refrigerator overnight.
- For a warm treat, microwave each cheesecake for about 15-20 seconds on low power, or until warmed through.
FAQs
Have questions about making these delightful desserts? Here are some common inquiries:
Can I use different types of apples for the Apple Crisp Mini Cheesecakes?
Absolutely! While Granny Smith and Honeycrisp apples are great choices for their balance of sweetness and tartness, feel free to use any variety you love. Just ensure they’re firm enough to hold up during baking.
How do I make Apple Crisp Mini Cheesecakes gluten-free?
You can easily make these mini cheesecakes gluten-free by using gluten-free graham cracker crumbs and ensuring your oat choice is certified gluten-free. The recipe will still be just as delicious!
What can I serve with Apple Crisp Mini Cheesecakes?
These mini cheesecakes are delicious on their own, but you can enhance their flavor with a drizzle of caramel sauce or a scoop of dairy-free whipped cream for extra indulgence.
How long do Apple Crisp Mini Cheesecakes last?
When stored properly in the refrigerator, they will last up to 4 days. If frozen, they can be enjoyed for up to 2 months!
Final Thoughts
I hope you find joy in making these Apple Crisp Mini Cheesecakes! They truly capture the essence of fall with their warm spices and creamy texture. Perfect for sharing at gatherings or enjoying as a special treat at home, I know you’ll love every bite. Happy baking, and don’t forget to share your creations with friends and family!
Apple Crisp Mini Cheesecakes

Indulge in the delightful flavors of fall with these Apple Crisp Mini Cheesecakes. Each individual cheesecake features a creamy filling, spiced apples, and a crunchy oat topping, making them the perfect treat for cozy gatherings or a special weeknight dessert. These mini cheesecakes are not only easy to prepare but also allow everyone to enjoy their own serving, enhancing the joy of sharing. Plus, they can be made in advance, allowing you to savor precious moments with friends and family. Treat yourself to these comforting bites that capture the essence of autumn!
- Prep Time: 20 minutes
- Cook Time: 30 minutes
- Total Time: 50 minutes
- Yield: 12 servings 1x
- Category: Dessert
- Method: Baking
- Cuisine: American
Ingredients
- 3/4 cup graham cracker crumbs
- 1 1/2 tablespoons sugar
- 1/2 teaspoon cinnamon
- 3 tablespoons unsalted butter, melted
- 10 oz cream cheese, softened
- 6 tablespoons sugar
- 1 1/2 teaspoons vanilla
- 2 teaspoons all-purpose flour
- 1 egg
- 2 medium-small apples, peeled and chopped finely
- 2 teaspoons freshly squeezed lemon juice
- 1 1/2 teaspoons cinnamon
- 1/4 teaspoon nutmeg
- 2 tablespoons light brown sugar
- 1 1/2 teaspoons cornstarch
- 1/3 cup all-purpose flour
- 1/3 cup light brown sugar
- 1/3 cup quick-cooking oats
- 3/4 teaspoon cinnamon
- 1/8 teaspoon nutmeg
- 2 1/2 tablespoons unsalted butter, melted
- Caramel sauce for drizzling
Instructions
- Preheat your oven to 325°F and line a cupcake pan with paper liners.
- In a bowl, combine graham cracker crumbs, sugar, cinnamon, and melted butter. Press into each liner to form crusts.
- For the streusel topping, mix flour, brown sugar, oats, cinnamon, and nutmeg with melted butter until crumbly.
- Beat softened cream cheese with sugar until smooth; add vanilla and flour, then the egg. Mix until just combined.
- Fill each crust with cheesecake mixture about two-thirds full. Top with spiced apples mixed with lemon juice, brown sugar, cornstarch, cinnamon, and nutmeg.
- Sprinkle streusel topping over each mini cheesecake.
- Bake for 28-30 minutes until edges are set but centers jiggle slightly. Cool completely before refrigerating.
Nutrition
- Serving Size: 1 mini cheesecake (60g)
- Calories: 190
- Sugar: 14g
- Sodium: 130mg
- Fat: 9g
- Saturated Fat: 5g
- Unsaturated Fat: 4g
- Trans Fat: 0g
- Carbohydrates: 25g
- Fiber: 1g
- Protein: 3g
- Cholesterol: 30mg