Halloween Mummy Oreo Cookies
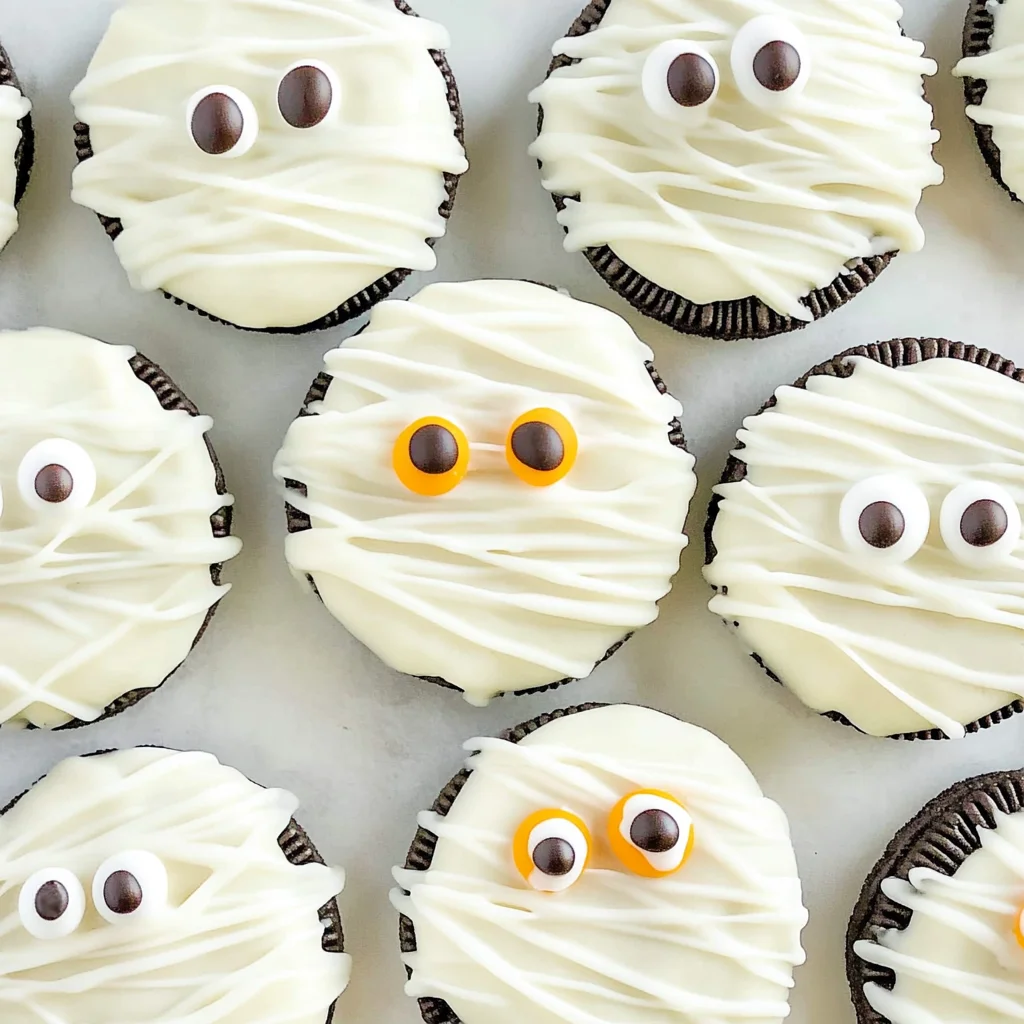
If you’re looking for a fun and festive treat to celebrate Halloween, these adorable Halloween Mummy Oreo Cookies are just the thing! They’re not only super simple to make, but they also bring a delightful charm to any gathering. Whether you’re hosting a spooky soirée, treating your kids after school, or just indulging in a sweet moment during this festive season, these cookies are sure to put a smile on everyone’s face.
What makes this recipe so special is its combination of creamy white chocolate and the classic crunch of Oreo cookies. Plus, the mummies are as cute as they are delicious! You’ll find that making these treats is a breeze, perfect for busy weeknights or family baking sessions. Gather your loved ones and get ready for some cookie-making fun!
Why You’ll Love This Recipe
- Quick and Easy Preparation: With just a few simple steps, you can whip up these Halloween Mummy Oreo Cookies in no time!
- Family-Friendly Fun: Kids will love helping out in the kitchen and decorating their own mummies with royal icing eyes.
- Make-Ahead Convenience: These cookies can be made ahead of time, allowing you to save some stress on party day.
- Delicious Flavor Combination: The mix of crunchy Oreos and sweet white chocolate is simply irresistible!
- Versatile Treats: Perfect for Halloween parties, classroom treats, or cozy nights at home with your family.

Ingredients You’ll Need
To create these spooky yet delightful Halloween Mummy Oreo Cookies, you’ll need some simple and wholesome ingredients. Don’t worry; you probably have most of them already!
For the Cookies
- Oreo Sandwich Cookies (your favorite flavor)
- 2 cups white chocolate melting wafers
- 2 tablespoons paramount crystals¹
- Royal icing eyes
Variations
This recipe is quite flexible, allowing you to get creative with flavors and decorations! Here are some fun ideas to make it your own:
- Try Different Oreo Flavors: Experiment with seasonal flavors like pumpkin spice or peppermint for a unique twist.
- Use Dark Chocolate: If you’re a fan of rich flavors, swap out the white chocolate for dark chocolate melting wafers.
- Add Sprinkles: Before the chocolate sets, sprinkle some colorful Halloween sprinkles on top for an extra festive touch.
- Make Them Gluten-Free: Use gluten-free Oreo cookies to accommodate any dietary needs while still enjoying this treat.
How to Make Halloween Mummy Oreo Cookies
Step 1: Prepare Your Workspace
Start by lining a baking sheet with parchment paper or a Silpat mat. This will help prevent the cookies from sticking and makes clean-up easier. Plus, it creates the perfect spot for your spooky mummies to chill while they harden!
Step 2: Melt the Chocolate
In a microwave-safe bowl, combine the white chocolate melting wafers with paramount crystals¹. Microwave on medium heat for 30 seconds, then stir slowly. Continue microwaving in 15-second increments until fully melted. This step is crucial because properly melted chocolate will coat your cookies smoothly without clumping.
Step 3: Dip Your Oreos
Using a fork or dipping tool, gently dip each Oreo cookie into the melted white chocolate. Make sure to tap off any excess chocolate before placing them on the lined baking sheet. While the chocolate is still soft, add royal icing eyes so they stick well. Allow your Halloween Mummy Oreo Cookies to sit until the chocolate hardens completely.
Step 4: Create Mummy Wrappings
Once the chocolate has set slightly but isn’t fully hardened, pour any remaining melted chocolate into a decorating bag or sandwich bag. Snip off a small corner and pipe lines back and forth over each cookie to create mummy wrappings—just be careful not to cover those adorable eyes! Let them sit until everything is firm again before enjoying your delicious creations.
Eat & Enjoy! Making these Halloween Mummy Oreo Cookies is not just about satisfying your sweet tooth; it’s about creating memories filled with laughter and joy!
Pro Tips for Making Halloween Mummy Oreo Cookies
Creating these adorable Halloween Mummy Oreo Cookies is a breeze, especially with a few handy tips!
-
Use Quality Chocolate: High-quality white chocolate melting wafers will give your cookies a smooth and shiny finish. Poor quality chocolate can seize up or not melt well, affecting the final look of your mummies.
-
Don’t Rush the Melting Process: Melting chocolate too quickly can lead to clumping. By using short increments in the microwave, you ensure an even melt, resulting in a silky texture that’s perfect for dipping.
-
Let Your Cookies Cool Completely: After dipping and decorating, allow your cookies to cool on the baking sheet until the chocolate hardens. This helps them maintain their shape and prevents any smudging of your mummy decorations.
-
Experiment with Oreos: While classic Oreos are delicious, feel free to use flavored varieties like mint or pumpkin spice for a fun twist that adds an extra layer of flavor to your spooky treats.
-
Get Creative with Eyes: Instead of royal icing eyes, you can also use candy eyes or even mini chocolate chips for a different look. This allows for personalization and can make decorating even more fun!
How to Serve Halloween Mummy Oreo Cookies
These Halloween Mummy Oreo Cookies are delightful on their own but can be presented in various ways to amp up the spooky fun during your festivities!
Garnishes
- Sprinkles: Use festive Halloween-themed sprinkles like orange and black jimmies to add a pop of color around the cookies.
- Chocolate Drizzle: A drizzle of dark chocolate on top can create a beautiful contrast against the white chocolate and add an extra touch of decadence.
Side Dishes
- Pumpkin Spice Cupcakes: These moist cupcakes topped with cream cheese frosting are perfect for fall and add a sweet contrast to your spooky cookies.
- Ghostly Banana Pops: Bananas dipped in white chocolate and decorated as ghost faces provide a healthy yet festive option that kids will love.
- Apple Slices with Caramel Dip: Fresh apple slices served with creamy caramel dip offer a crunchy sweetness that pairs wonderfully with the rich flavors of the cookies.
- Cheese Platter: A mix of cheeses along with crackers creates a savory balance alongside your sweet treats, making it great for gatherings where guests might want both sweet and savory options.
With these tips and serving suggestions, you’ll create not just delicious but also visually appealing treats that will be the highlight of any Halloween celebration! Enjoy your baking adventure!
Make Ahead and Storage
These Halloween Mummy Oreo Cookies are perfect for meal prep, allowing you to whip up a spooky treat ahead of time for parties or family gatherings!
Storing Leftovers
- Store the cookies in an airtight container at room temperature to keep them fresh.
- If you have leftovers, place a piece of wax paper between layers to prevent sticking.
- They can be stored for up to 5 days.
Freezing
- To freeze, place the cookies in a single layer on a baking sheet and freeze until solid.
- Once frozen, transfer them to a freezer-safe bag or container.
- They can be kept in the freezer for up to 1 month. Thaw before serving.
Reheating
- These cookies are best enjoyed at room temperature; no reheating is necessary.
- If desired, let them sit out for about 30 minutes before serving to regain their original texture.
FAQs
Got questions? No worries! Here are some common inquiries about Halloween Mummy Oreo Cookies.
Can I use other types of cookies for Halloween Mummy Oreo Cookies?
Absolutely! While Oreos are classic, feel free to experiment with different sandwich cookies. Just ensure they’re sturdy enough to hold the chocolate coating.
How do I make my Halloween Mummy Oreo Cookies look extra spooky?
To enhance the spooky factor, get creative with your piping! Use darker chocolate drizzle for added contrast, or sprinkle edible glitter on top after decorating.
Are Halloween Mummy Oreo Cookies suitable for kids?
Yes! These cookies are fun and safe for kids. Just supervise during the melting and decorating process if they’re helping out.
What other decorations can I use for Halloween Mummy Oreo Cookies?
You can use candy eyes or even mini chocolate chips instead of royal icing eyes. Add sprinkles or colored sugar to give them an extra festive touch!
Final Thoughts
I hope you enjoy making these delightful Halloween Mummy Oreo Cookies as much as I do! They’re not only simple but also a fun way to celebrate the season with loved ones. Whether you’re sharing them at a party or enjoying them at home, these treats are sure to bring smiles all around. Happy baking, and don’t forget to get creative!
Halloween Mummy Oreo Cookies
Get ready to whip up some Halloween magic with these delightful Halloween Mummy Oreo Cookies! These charming treats are not only simple to prepare but also a fantastic way to bring festive cheer to any gathering. With a creamy white chocolate coating enveloping crunchy Oreo cookies, they are irresistibly delicious and super fun for kids and adults alike. Perfect for Halloween parties, classroom treats, or cozy family nights, these cookies will surely be the star of the show. Gather your ingredients, invite your loved ones into the kitchen, and let’s create some spooky delights!
- Prep Time: 15 minutes
- Cook Time: 10 minutes
- Total Time: 25 minutes
- Yield: Approximately 12 cookies 1x
- Category: Dessert
- Method: Baking
- Cuisine: American
Ingredients
- Oreo Sandwich Cookies (your favorite flavor)
- 2 cups white chocolate melting wafers
- 2 tablespoons paramount crystals
- Royal icing eyes
Instructions
- Line a baking sheet with parchment paper.
- In a microwave-safe bowl, combine the white chocolate melting wafers and paramount crystals. Microwave in 30-second intervals, stirring until fully melted.
- Dip each Oreo cookie into the melted chocolate, tap off excess, and place on the lined baking sheet. Add royal icing eyes while the chocolate is still soft.
- Once the chocolate has set slightly, pipe remaining melted chocolate over each cookie to create mummy wrappings. Let cool completely before enjoying.
Nutrition
- Serving Size: 1 cookie (30g)
- Calories: 150
- Sugar: 12g
- Sodium: 45mg
- Fat: 7g
- Saturated Fat: 4g
- Unsaturated Fat: 3g
- Trans Fat: 0g
- Carbohydrates: 20g
- Fiber: 0g
- Protein: 1g
- Cholesterol: 0mg


