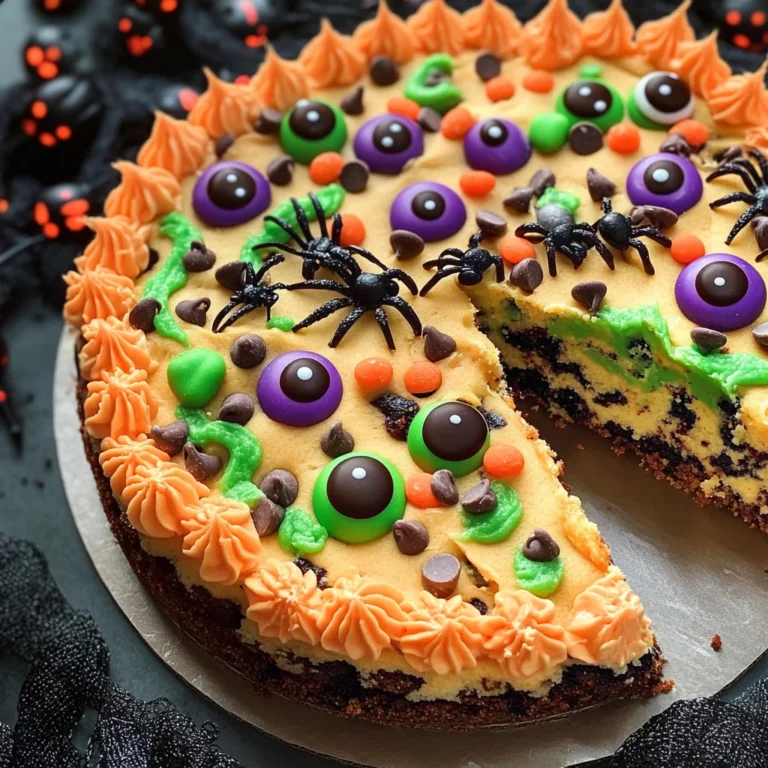
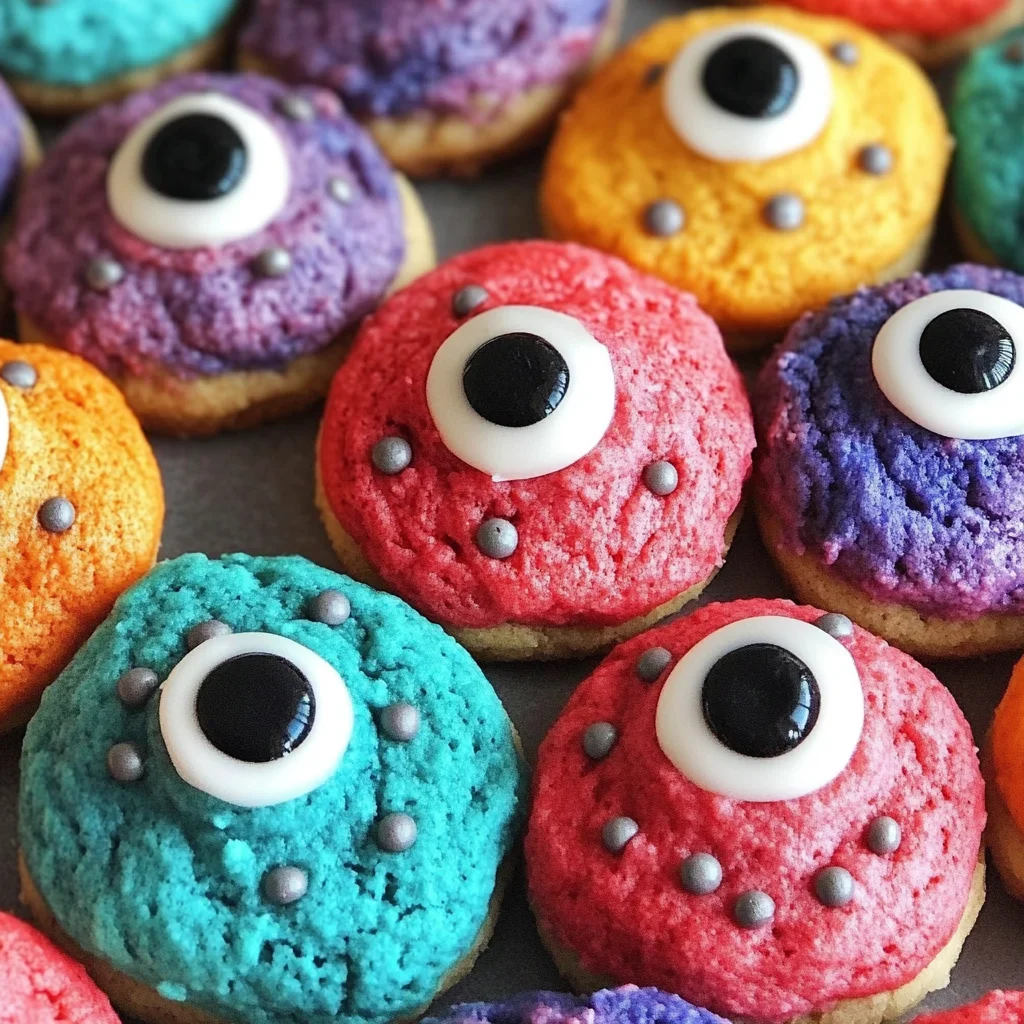
Monster Eye Cookies
If you’re looking for a fun and festive treat that will make this Halloween extra special, you’ve come to the right place! These Monster Eye Cookies are not just adorable; they’re also super easy to make. Your kids will love getting their hands in the dough and picking out vibrant colors for these playful cookies. Whether you’re hosting a Halloween party or just want to add a little spooky flair to family gatherings, these cookies are sure to bring smiles all around.
What makes Monster Eye Cookies even more delightful is how versatile they are. You can whip them up quickly, making them perfect for busy weeknights or last-minute celebrations. Plus, they taste as good as they look!
Why You’ll Love This Recipe
- Easy to Make: With just a few simple steps, you’ll have a batch of colorful cookies ready in no time.
- Family Fun: Involve your kids in cookie decorating—it’s a great way to bond and create lasting memories.
- Festive Appeal: Bright colors and googly eyes make these cookies the star of any Halloween gathering.
- Customizable Colors: Use your favorite neon shades to personalize your treats for any occasion.
- Deliciously Soft: The combination of cream cheese and butter gives these cookies a moist, soft texture everyone will enjoy.
Ingredients You’ll Need
Let’s gather our simple, wholesome ingredients for these Monster Eye Cookies! You might already have most of them in your pantry.
- 1/2 cup Butter, Softened
- 8 oz Cream Cheese, Softened
- 1 Egg
- 1/2 tsp Vanilla
- 1 box White Cake Mix
- Neon Food Coloring
- Candy Eyes
Variations
This recipe is wonderfully flexible, allowing you to get creative with flavors and decorations. Here are some ideas to switch things up:
- Experiment with Flavors: Swap out the vanilla for almond extract for a nutty twist!
- Add Sprinkles: Mix in some fun sprinkles before baking for an extra festive crunch.
- Try Different Colors: Use pastel shades instead of neon for a softer look perfect for spring celebrations.
- Make Them Gluten-Free: Substitute the white cake mix with a gluten-free alternative to accommodate dietary needs.
How to Make Monster Eye Cookies
Step 1: Preheat the Oven
Start by preheating your oven to 350 degrees Fahrenheit. This ensures that your cookies bake evenly and come out perfectly soft.
Step 2: Combine the Main Ingredients
In a mixing bowl, beat together the softened butter, cream cheese, egg, and vanilla until smooth. Mixing these ingredients well creates that rich flavor that makes these cookies so delicious!
Step 3: Prepare the Cookie Dough
Next, mix in the white cake mix until everything is well combined. This step is important because it gives the cookies their lovely structure and sweetness.
Step 4: Add Some Color
Divide the cookie dough into separate bowls based on how many colors you want to use. Add neon food coloring to each bowl and mix until you achieve your desired brightness. This part is where the fun starts—let your creativity shine!
Step 5: Shape Your Cookies
Scoop out about 1½ tablespoons of dough and place them onto your prepared baking sheet. Leave some space between each ball; they’ll spread while baking!
Step 6: Bake Away!
Pop those colorful cookie balls in the oven and bake for about 10 minutes. Keep an eye on them; you’ll want them just set but still soft!
Step 7: Decorate with Candy Eyes
As soon as they come out of the oven, gently press candy eyes into the warm cookies. This step adds character and whimsy—perfect for Halloween fun!
Now you’re ready to enjoy some delightfully spooky Monster Eye Cookies with friends and family! Happy baking!
Pro Tips for Making Monster Eye Cookies
Making Monster Eye Cookies is as much about the fun as it is about the flavor! Here are some tips to help you create these delightful treats perfectly every time.
-
Use Room Temperature Ingredients: Starting with softened butter and cream cheese ensures a smoother batter, resulting in cookies that bake evenly and have a light, fluffy texture.
-
Experiment with Colors: Don’t be afraid to mix different neon food colors to create unique shades. This adds a personal touch and makes your cookies even more eye-catching!
-
Scoop Evenly: Using a cookie scoop or measuring spoon helps ensure that all your cookies are the same size, which means they’ll bake evenly and look uniform on your platter.
-
Don’t Overbake: Keep an eye on your cookies while they are in the oven. They should be just set but still soft in the center; this helps preserve their chewy texture.
-
Add Eyes Immediately: Placing candy eyes on the cookies right after taking them out of the oven allows them to stick better. The warmth from the cookie will help them adhere nicely!
How to Serve Monster Eye Cookies
Presentation can make these spooky treats even more fun! Here are some creative ideas for serving your Monster Eye Cookies at your next Halloween gathering.
Garnishes
- Sprinkles: A sprinkle of colorful Halloween-themed sprinkles can add an extra festive touch to your cookies.
- Whipped Coconut Cream: A dollop of whipped coconut cream can provide a creamy contrast to the sweet cookie and enhance the overall presentation.
Side Dishes
- Pumpkin Spice Muffins: These warm muffins are perfect for fall and complement the sweetness of the Monster Eye Cookies beautifully.
- Apple Slices with Caramel Dip: Fresh apple slices add a refreshing crunch, and pairing them with a vegan caramel dip creates a delightful contrast.
- Veggie Platter with Hummus: A colorful array of veggies served with hummus balances out all those sweets and provides a healthy option for your guests.
- Popcorn Mix: A fun popcorn mix seasoned with pumpkin spice or drizzled with vegan chocolate offers a crunchy snack that pairs well with cookies.
No matter how you choose to present these Monster Eye Cookies, they’re sure to bring smiles and delight to all who see (and taste) them! Happy baking!

Make Ahead and Storage
These Monster Eye Cookies are not only a delight to make, but they also fit perfectly into your meal prep plans. You can whip up a batch in advance and keep them fresh for enjoying later or sharing with friends!
Storing Leftovers
- Allow the cookies to cool completely before storing.
- Place them in an airtight container at room temperature for up to 3 days.
- For longer freshness, consider refrigerating them, where they can last up to a week.
Freezing
- To freeze, ensure the cookies are fully cooled.
- Place them in a single layer on a baking sheet and freeze for about an hour.
- Once frozen, transfer the cookies to a freezer-safe bag or container, separating layers with parchment paper.
- They can be stored in the freezer for up to 3 months.
Reheating
- If you prefer warm cookies, preheat your oven to 300 degrees F (150 degrees C).
- Place the cookies on a baking sheet and heat for about 5-7 minutes until warmed through.
- Avoid microwaving as this may change their texture.
FAQs
Here are some common questions about Monster Eye Cookies that might assist you on your baking adventure!
Can I use different colors of food coloring for Monster Eye Cookies?
Absolutely! Feel free to mix and match any neon food colors you love. The more vibrant, the better!
How do I make sure my Monster Eye Cookies turn out soft and chewy?
To achieve soft cookies, don’t overbake them. They should be slightly underdone when you take them out of the oven; they will continue to firm up as they cool.
Can I make Monster Eye Cookies ahead of time?
Yes! You can prepare these cookies in advance and store or freeze them as mentioned above. They’re perfect for holiday baking!
What can I substitute if I don’t have cream cheese?
You can use mascarpone cheese or even a dairy-free cream cheese alternative if you’re looking for something lighter or vegan-friendly.
Are Monster Eye Cookies suitable for kids’ parties?
Definitely! These fun and colorful cookies are perfect for kids’ parties or Halloween gatherings. Kids will love both making and eating these spooky treats!
Final Thoughts
I hope you’re as excited about making these Monster Eye Cookies as I am! They’re not just delicious; they’re also a fantastic way to bring some fun into your baking routine. Whether you’re whipping them up for Halloween festivities or just because, I’m sure everyone will love their playful appearance and delightful taste. Enjoy your cookie-making adventure and don’t forget to share your creations with loved ones!
Monster Eye Cookies

Get ready to bake a batch of delightful Monster Eye Cookies that are sure to be the highlight of your Halloween celebrations! These colorful treats are not only fun and festive but also super simple to make. With their vibrant hues and playful googly eyes, these cookies will bring smiles to kids and adults alike. Perfect for parties or family gatherings, this recipe invites creativity as you customize the colors and decorations. Enjoy the soft, chewy texture created by a blend of cream cheese and butter, making each bite a delicious experience.
- Prep Time: 15 minutes
- Cook Time: 10 minutes
- Total Time: 25 minutes
- Yield: Approximately 24 cookies 1x
- Category: Dessert
- Method: Baking
- Cuisine: American
Ingredients
- 1/2 cup softened butter
- 8 oz softened cream cheese
- 1 egg
- 1/2 tsp vanilla extract
- 1 box white cake mix
- Neon food coloring
- Candy eyes
Instructions
- Preheat your oven to 350°F (175°C).
- In a mixing bowl, beat the softened butter, cream cheese, egg, and vanilla until smooth.
- Gradually mix in the white cake mix until well combined.
- Divide the dough into bowls based on the number of colors you want, adding neon food coloring to each bowl and mixing until vibrant.
- Scoop about 1½ tablespoons of dough onto a prepared baking sheet, leaving space between each cookie.
- Bake for 10 minutes, until just set but still soft.
- Press candy eyes into warm cookies immediately after baking.
Nutrition
- Serving Size: 1 cookie (30g)
- Calories: 120
- Sugar: 10g
- Sodium: 80mg
- Fat: 6g
- Saturated Fat: 3g
- Unsaturated Fat: 2g
- Trans Fat: 0g
- Carbohydrates: 14g
- Fiber: <1g
- Protein: 1g
- Cholesterol: 25mg